[Notion] 노션으로 빠르게 메모하는 방법
노션의 다양한 기능과 확장성은 참 좋지만 일렉트론 기반으로 느린 구동 속도가 단점이다. 특히 간단한 메모를 빠르게 기록하기 참 애매하다. Unclutter의 Notes 기능 같은 것이 있으면 참 좋을 텐데 말이다. Unclutter는 맥용 생산성 앱으로 화면 상단에 마우스를 대고 아래로 스크롤하거나 트랙패드를 두 손가락으로 쓸어내리면 숨겨져 있던 Unclutter 패널이 나온다. 이 패널에서 메모 입력은 물론 클립보드를 관리하거나 파일 등을 저장해 두고 필요할 때 바로 드래그하여 쓸 수 있다. 하지만 Unclutter는 플레인 텍스트만 지원하고 클라우드 동기화도 지원하지 않는다.

다행히도 이런저런 검색으로 노션을 빠르게 메모하는 방법을 찾아냈다. 방법은 2가지다.
- Fluid를 이용해 Notion 앱을 생성한 뒤 Mac 메뉴바에 고정시켜 사용하는 방법.
- Slidepad 혹은 Better and Better를 사용해 Notion을 사이드바에 두고 사용하는 방법.
방법 1 : Fluid를 이용해 맥 메뉴바에 고정시켜 사용하기
Fluid는 웹페이지를 응용프로그램(App)으로 만들어주는 맥용 툴이다. Notion은 웹 버전을 지원하므로 Fluid를 이용해 원하는 노션 페이지를 Fluid App으로 만들고, 이 노션 페이지 App을 플로팅 윈도우 형식으로 메뉴바에 고정시킬 수 있다. 여기에 커스텀 CSS를 적용하여 디자인을 간결하게 바꿔주면 깔끔한 빠른 메모 입력이 가능해진다.

✏️ 설정 방법
1. Fluid 설치
다운로드 링크 (유료)
2. Fluid App 생성
아래 이미지처럼 입력한다. ▼
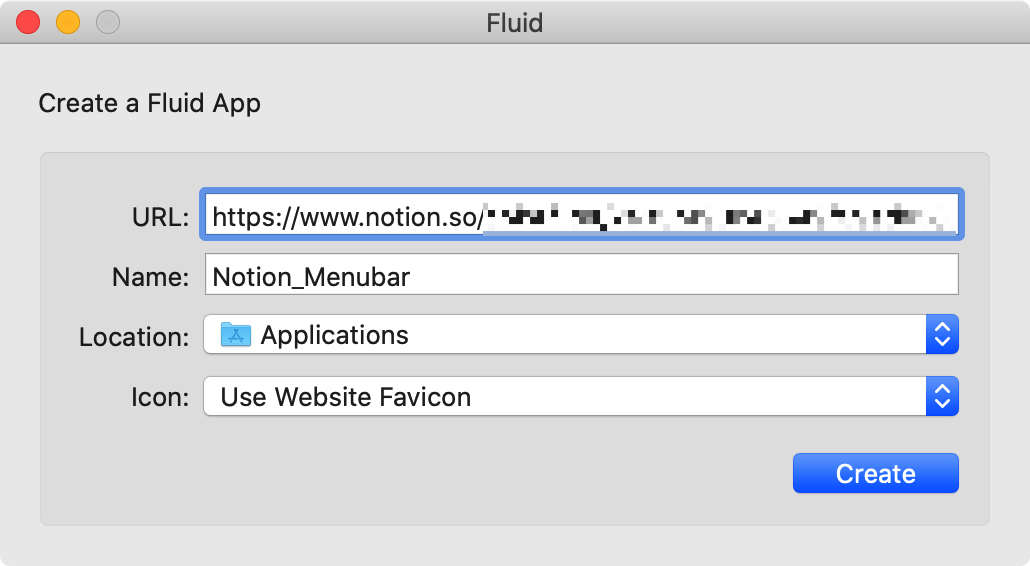
- URL : 원하는 노션 페이지 Link 입력
- Name : 원하는 App 이름 입력
- Location : 생성될 Fluid App이 저장될 폴더 선택. Application 폴더를 추천.
- Icon : App 아이콘 소스 선택
3. App 로그인
Google 로그인 에러가 난다면 Email 로그인으로 시도해보자.
4. Windows Level 변경
App 우측 상단 메뉴 > Preference > Windows Level을 Floating으로 변경. ▼

5. 메뉴바 고정
App 메뉴바 설정 > Pin to Status Bar 선택. 앱을 다시 실행해야 적용된다. ▼

6. 커스텀 CSS 적용
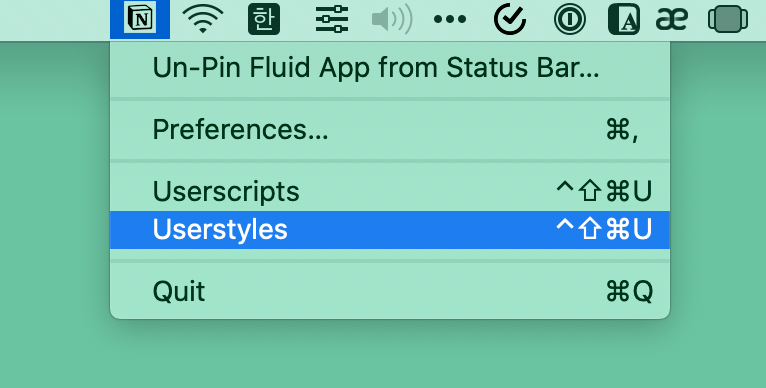
메뉴바의 Notion 앱 아이콘에 마우스 우클릭 > Userstyles 선택 ▼
🔎 CSS 코드 복사 ▼
/* CSS version 4 - updated 8th May 2019 */
/* This version adds support for pop-ups on database screens and hides commenting */

div.notion-topbar>div>div:first-child,
div.notion-topbar>div>div:last-child,
div.notion-help-button,
div.notion-sidebar-container,
div.notion-frame div.notion-scroller.vertical.horizontal>div:first-child,
div.notion-frame div.notion-scroller.vertical:not(.horizontal)>div:first-child,
div.notion-frame div.notion-scroller.vertical.horizontal>div>div>div.notion-selectable,
div.notion-frame div.notion-scroller.vertical:not(.horizontal)>div>div>div:not(.notion-selectable)>div>div:nth-child(1),
div.notion-frame div.notion-scroller.vertical:not(.horizontal)>div>div>div:not(.notion-selectable)>div>div:nth-child(2),
div.notion-frame div.notion-scroller.vertical:not(.horizontal)>div>div>div:not(.notion-selectable)>div>div:nth-child(3),
div.notion-peek-renderer>div:nth-child(2)>div:first-child,
div.notion-peek-renderer> div:nth-child(2)>div.notion-scroller.vertical>div:nth-child(3)>div {
    display:none !important;
}

div.notion-topbar,
div.notion-topbar>div {
    height: 30px !important;
}

div.notion-page-controls {
    visibility:hidden !important;
    margin-top: 0px !important;
}

div.notion-page-content {
    padding-left: 20px !important;
    padding-right: 8px !important;
}

div.notion-selectable {
    max-width: none !important;
}

div.notion-topbar,
div.notion-cursor-listener,
div.notion-frame,
div.notion-frame>div:nth-child(1),
div.notion-frame > div.notion-scroller.vertical > div:nth-child(1) {
    width: 100% !important;
    max-width: 100% !important;
}

div.notion-frame>div.notion-scroller.vertical:not(div.notion-scroller.horizontal)>div:nth-child(2),
div.notion-frame>div.notion-scroller.vertical>div.notion-scroller.horizontal>div {
    padding-left: 12px !important;
    padding-right: 12px !important;
}

div.notion-peek-renderer>div:nth-child(2) {
    top: 5% !important;
    left: 8% !important;
    right: 8% !important;
}

div.notion-peek-renderer>div:nth-child(2)>div.notion-scroller.vertical>div:nth-child(1)>div,
div.notion-peek-renderer>div:nth-child(2)>div.notion-scroller.vertical>div:nth-child(2)>div {
    padding-left: 20px !important;
    padding-right: 20px !important;
}
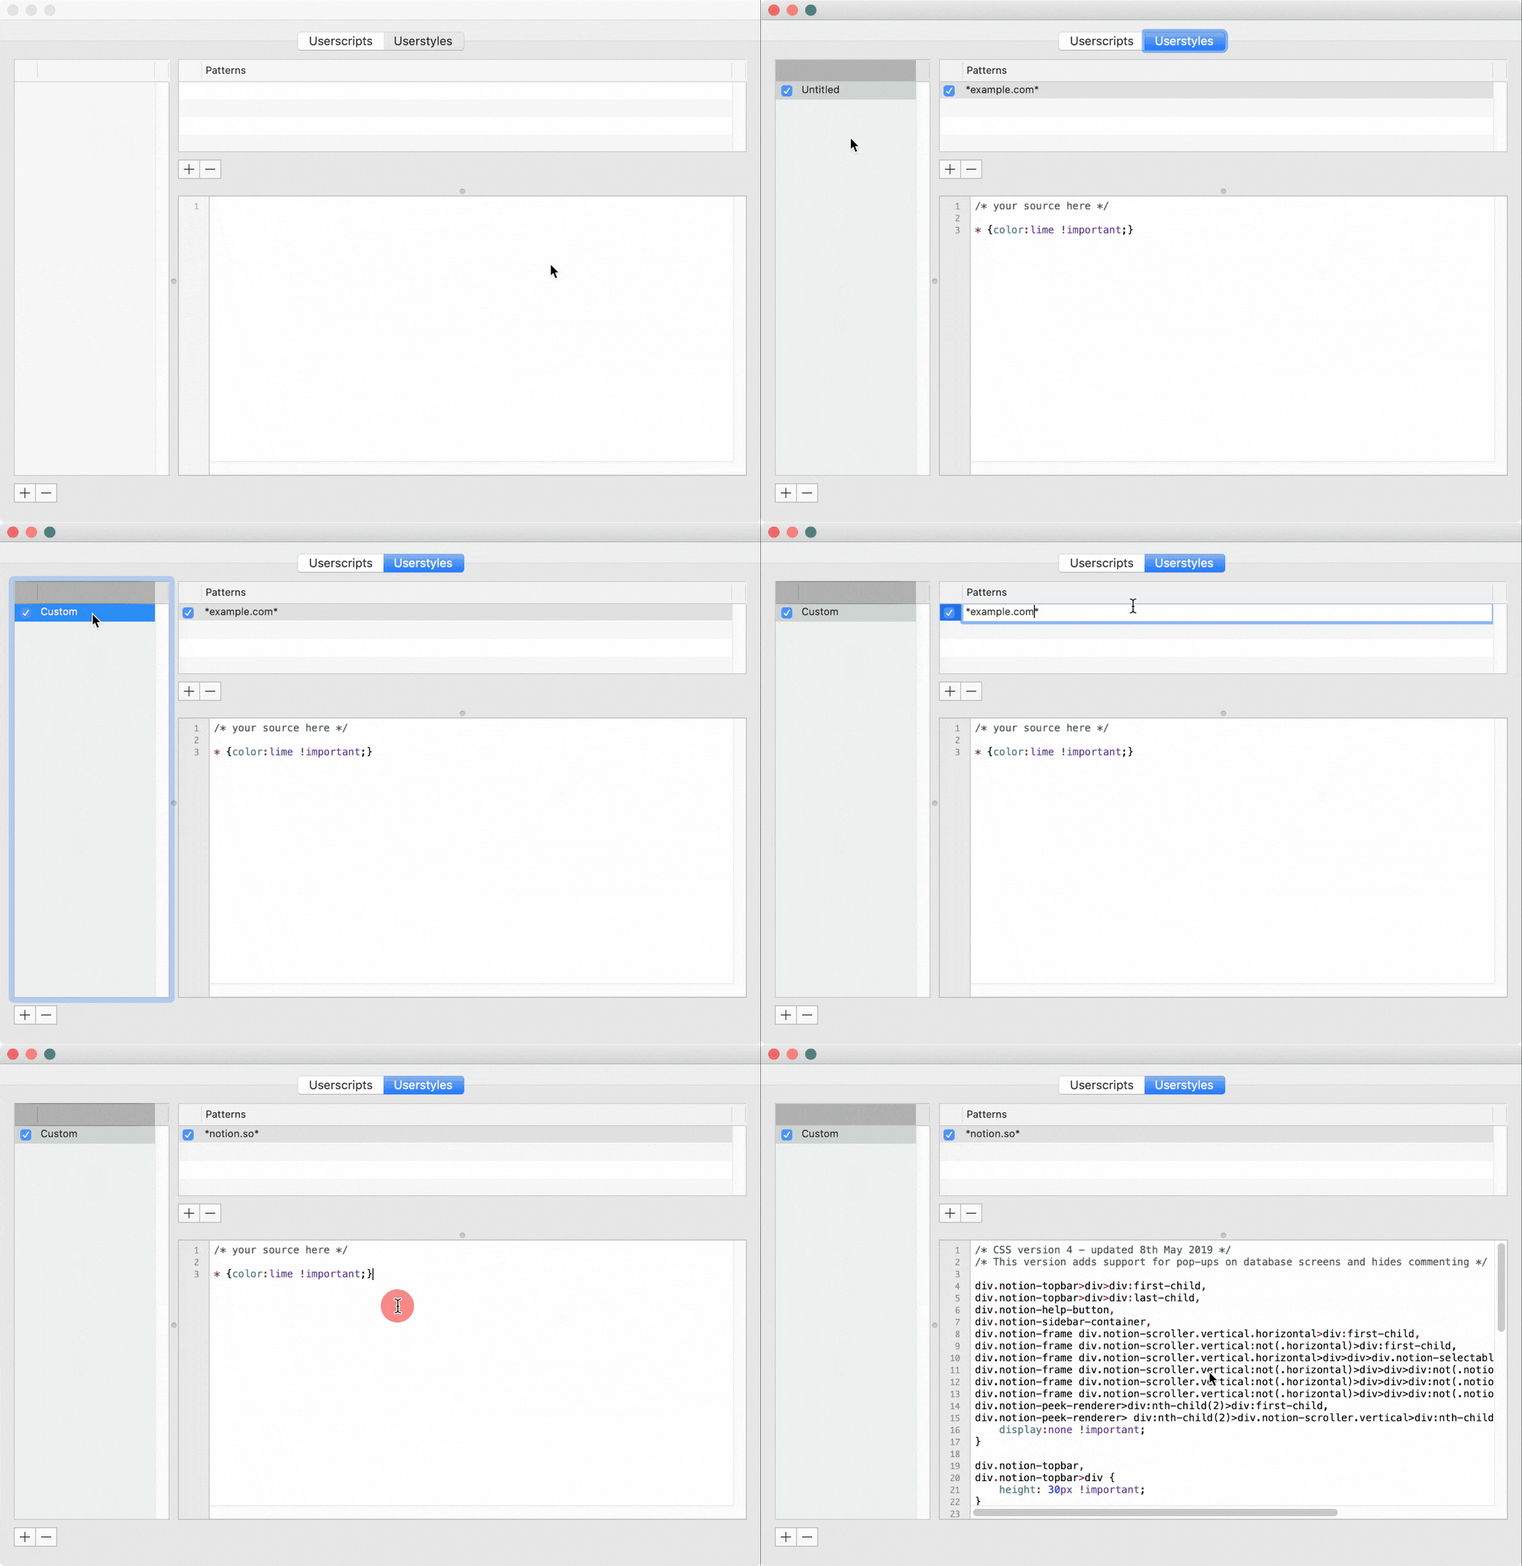
🔎 복사한 CSS코드를 아래 GIF 참고하여 Userstyles에 추가 ▼
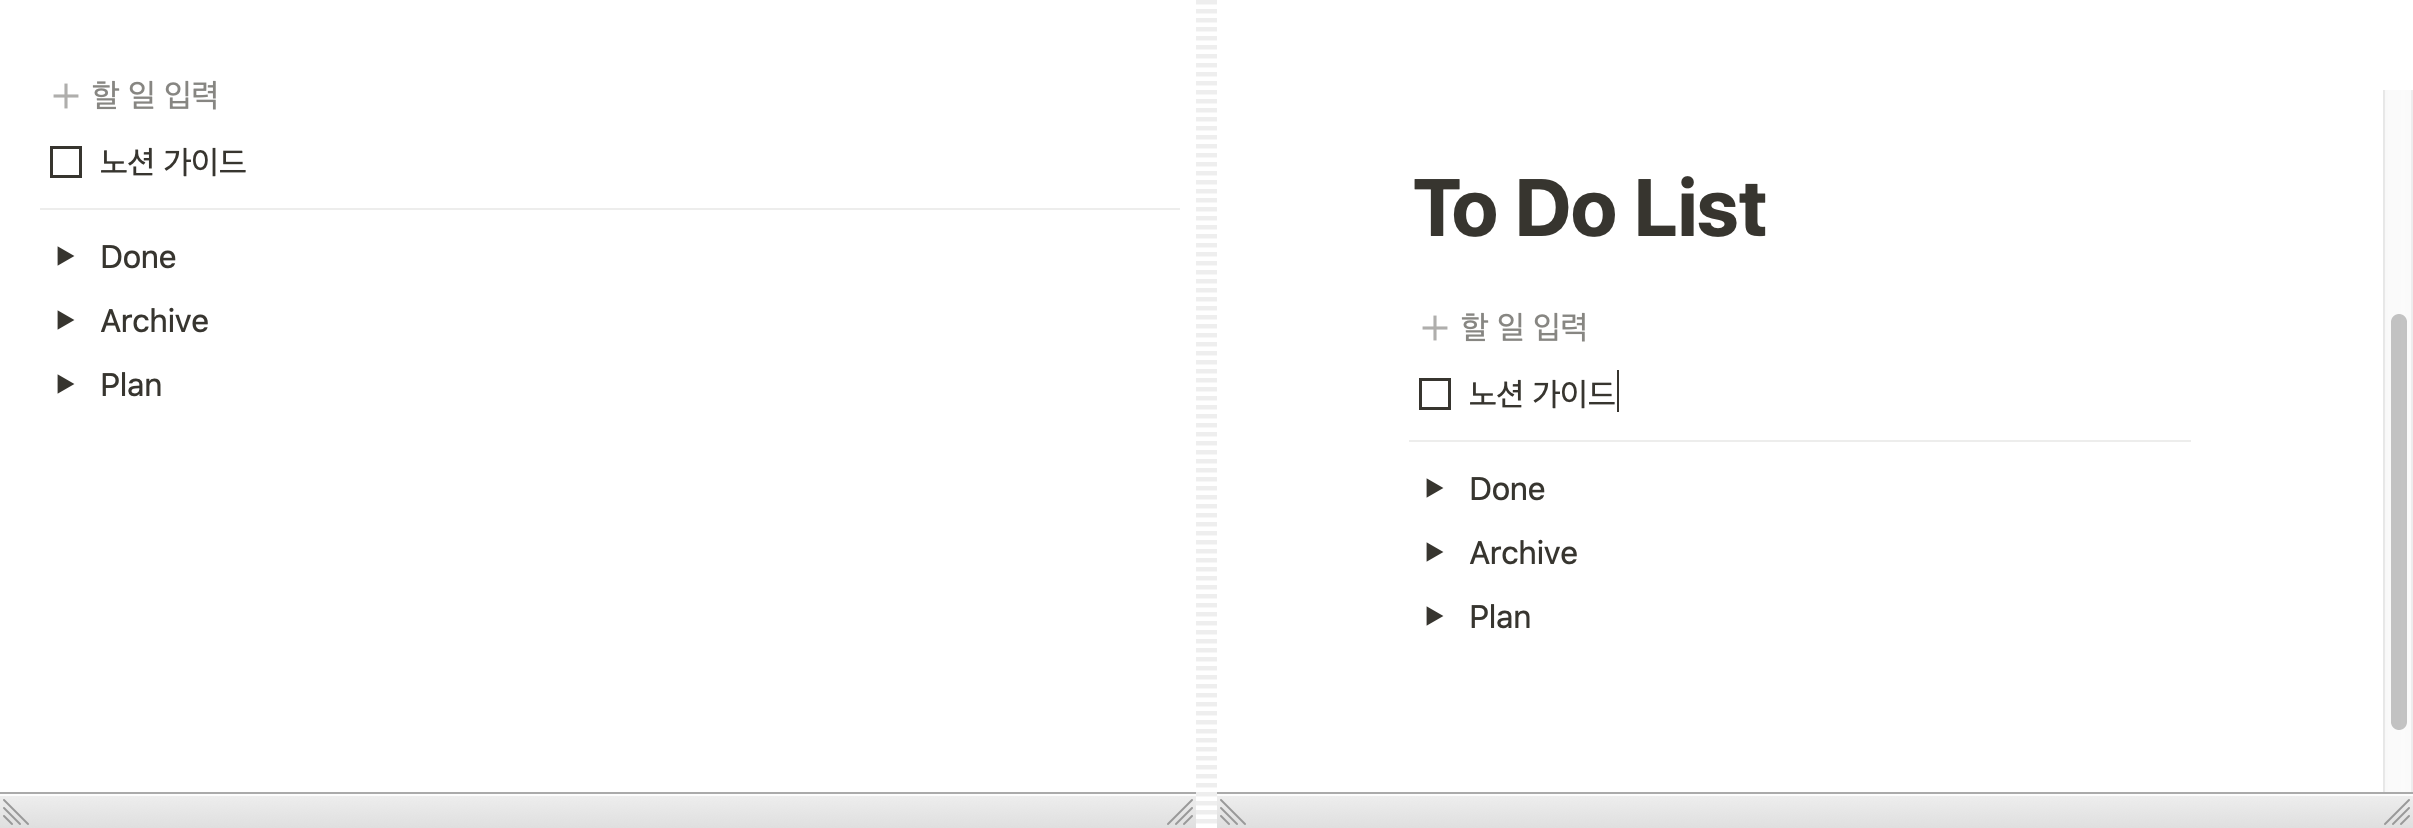
🔎 일반, 커스텀 CSS 적용 비교 화면 ▼
7. Tab 기능 활용
[CMD+Tab] 혹은 [CMD+마우스 좌클릭]하여 새로운 탭을 생성할 수 있다. ▼

방법 2 : Slidpad 활용
Slidepad 혹은 Better and Better를 이용하여 화면 측면의 숨겨진 슬라이드 창이 나타나는 방식으로 노션을 빠르게 이용할 수 있다. Slidepad는 노션 웹페이지에 로그인하는 방식이며 슬라이드 창 고정 기능을 지원한다. Better and Better는 노션 클라이언트를 슬라이드 창으로 만들어주며 창 고정 기능은 지원하지 않는다. 개인적으로 Slidepad가 Notion 외에 다른 서비스도 손쉽게 적용할 수 있어 추천한다. 포스팅 역시 Slidepad 기준으로 작성했다.

✏️ 설정 방법
1. Slidepad 설치
다운로드 링크 (유료)
2. Slidepad에 Notion 추가
Most Used에 있는 Notion 선택 > 로그인하여 바로 사용 가능 ▼

(옵션) 창 고정
필요시 슬라이드 창을 고정하여 사용할 수 있다. ▼
(옵션) 모바일 모드
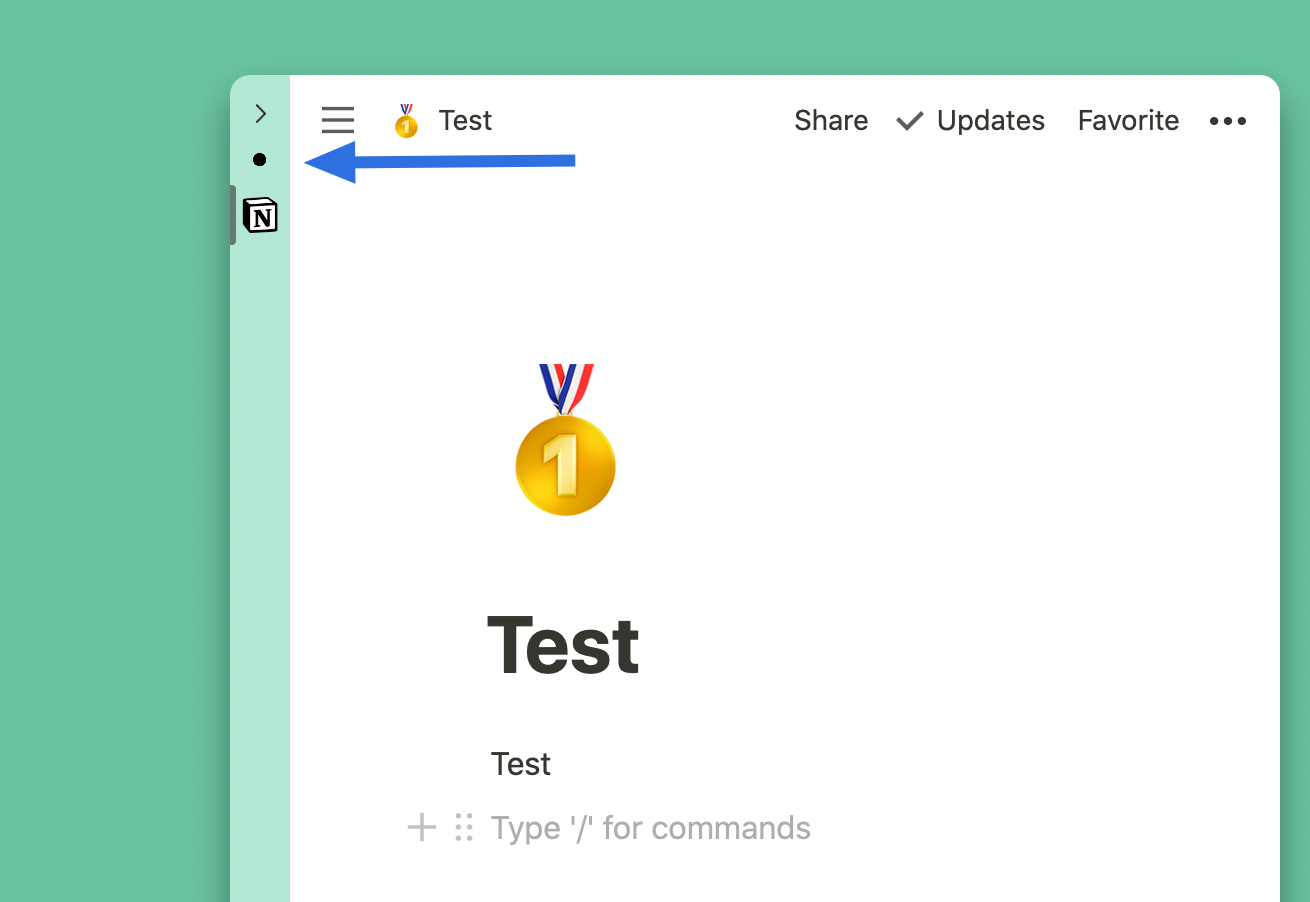
필요시 모바일 버전으로 전환해 사용할 수 있다. 좌측 노션 아이콘을 우클릭하면 선택 옵션이 나온다. ▼

Fluid, Slidepad 모두 웹 페이지를 빠르게 액세스 할 수 있어 Evernote, Gmail, Slack, Youtube 등 다양한 서비스에 적용할 수 있다. 단점은 둘 다 유로라는 것. Fluid는 $5, Slidpad는 $9.99로 살짝 비싼 편이다. Slidpad는 Setapp에서도 이용할 수 있다.
▶︎ 참고글
'⌚️ Productivity' 카테고리의 다른 글
| [Mac OS] 맥 마우스 우클릭 메뉴를 윈도우처럼 사용하기 - iRightMouse (5) | 2020.02.27 |
|---|---|
| [Notion] 노션으로 간단한 투표 시스템 만들기 (7) | 2020.02.25 |
| Apple 애플의 온라인 박물관 — The Apple Archive (4) | 2020.02.11 |
| [Notion] 노션으로 앱, 소프트웨어 구독 관리하기 (17) | 2020.02.05 |
| [Notion] 노션 공개 페이지에 도메인 연결하기 (45) | 2020.01.28 |
댓글
이 글 공유하기
다른 글
-
[Mac OS] 맥 마우스 우클릭 메뉴를 윈도우처럼 사용하기 - iRightMouse
[Mac OS] 맥 마우스 우클릭 메뉴를 윈도우처럼 사용하기 - iRightMouse
2020.02.27 -
[Notion] 노션으로 간단한 투표 시스템 만들기
[Notion] 노션으로 간단한 투표 시스템 만들기
2020.02.25 -
Apple 애플의 온라인 박물관 — The Apple Archive
Apple 애플의 온라인 박물관 — The Apple Archive
2020.02.11 -
[Notion] 노션으로 앱, 소프트웨어 구독 관리하기
[Notion] 노션으로 앱, 소프트웨어 구독 관리하기
2020.02.05